

Eggs and baskets.
This is the third part of a short series of blog posts on the importance of backing up your data - I’ll update it with links to each part as they go live.
- Introduction
- The 3-2-1 Rule (or 50 ways to lose your data)
- Local Hero
- Spread it about - this article
- Offsite Backup
- Summary
Yesterday we set up a local (and automatic) backup to make it as easy as possible to get your data back in case of disaster.
But as I’m sure you remember we don’t trust to that alone - we need to keep working at our 3-2-1 rule.
Now it’s time to get to that second media.
A second basket for our eggs.
This is the second of our 3 copies from the 3-2-1 rule.
This is not much harder than the first copy, but buys us a lot of protection. This might be a USB stick like the one you already set up (you did already do that, didn’t you?) or an external hard disk if you want to back up more than just your writing project - and you should, really.
Again we can choose to do this manually - maybe once a week you plug in your device, copy over the files you want to keep and then unplug it again. And that’s fine, until you inevitably forget - or worse yet copy the files the wrong way and overwrite your current work with last week’s. And yes, I’ve done that.
So once again we want to automate it if we possibly can. Scrivener lets us set our automatic backup to be an external drive, and that works well. But ideally we want to back up more than just our writing so we will use the computer’s operating system to help us.
MacOS
Macs have a built-in backup application called ‘Time Machine’ which will take care of this all for you. Go into your System Preferences and there’ll be an icon of a clock with an arrow pointing backwards around it - click on that. Plug in your storage device, ideally a nice big external hard disk but your USB stick will do. Then press on Select Backup Disk and choose that disk from the list available.
This will erase everything on that disk - make sure you don’t have anything on there that you need!
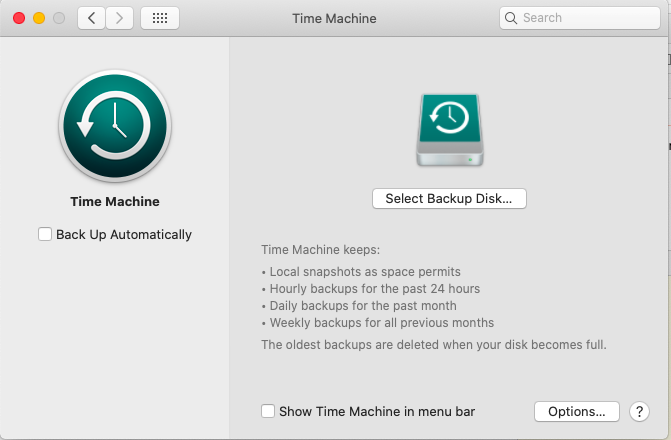
By default it will back up everything on your computer, but you can select just a few folders to back up by clicking Options and telling it not to back up certain places.
After you have done one initial backup, it will do a backup every hour and keep a history of your changes until the disk fills up - then it removes the oldest copies as it continues to work. If you unplug the disk it will just wait until you next connect it and then pick up where it left off.
For more details refer to this help document from Apple .
Windows 10
Windows 10 has a similar (though much less snappily-named) tool called ‘File History’. To set it up, go to Settings and then select Update & Security. In the left hand panel you’ll be able to click on Backup and then Add a Drive in the right hand panel.
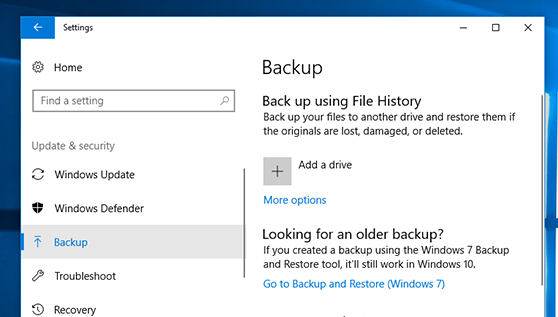
For more details refer to this help document from Microsoft .
Getting it back
That’s fantastic! Now you have a completely automatic backup on two different devices - from our 3-2-1 rule we’re up to 2-2-0… still not enough but a lot better.
But a backup is no good until we see it restore - so how do we do that?
MacOS
Make sure your backup device is plugged in. From the Time Machine icon on the taskbar, select Enter Time Machine - after a few seconds you’ll get a fun little animation and see a Finder window in the middle of the screen. You can navigate this as normal to find the file you want from the most recent backup, but if you want something historical that’s also easy to find.
On the right hand side is a timeline, which you can scroll back and forth along to see the complete list of backups since you started. You can go back to whenever you like and select the files you need, before clicking Restore to copy them back to your computer.
For more details refer to this help document from Apple .
Windows 10
Make sure your backup device is plugged in. Type Restore Files into the search box in the task bar.
A list of matches will appear - select Restore your files with File History.
You can navigate this as normal to find the file you want from the most recent backup, but if you want something historical that’s also easy to find.
You can use the arrows to go back to whenever you like and select the files you need, before clicking Restore to copy them back to their original place on your computer. To save it in a different place, right-click Restore, select Restore to, and then choose a new location.
For more details refer to this help document from Microsoft .
Testing 1 2 3 4
No backup is worth anything if you can’t restore from it - you need to be confident you can get your files back. So I urge you to take a few minutes once that initial backup is completed to look for a file and see that you can restore it safely. Be familiar with your backup and restore options, so that when the worst happens you can be confident that you can get your files back without any unnecessary hassle.
Tomorrow we’ll finally get to 3-2-1 and ensure that you have an offsite backup you can trust.

Photo by Dewang Gupta on Unsplash